Gurian Neck Removal and Upgrade
Gurian guitars use a mortise and tenon joint and dual horizontal tapered pins inside the neck block to keep the neck firmly attached to the body. Like many other guitars, the fret board extension is glued to the top. To remove the neck, first reduce the truss rod tension (1/8 inch Allen wrench), then detach the fret board extension. Remove the tapered pins and pull out the neck. Those pesky pins are not so easily removed. One or both pins may be broken off. Or you might wonder if there is a tool to press them out.
Precautions
Please note, I said “detach the fret board extension”. A loose neck and an unpinned neck to body joint practically guarantees a broken extension. Also, when you have extension detached, tapered pins removed and a nice loose tenon, the neck still does not want to come out. And, believe me, there is no taper or other angular joint machinations holding the tenon in place. It’s a simple straight sided tenon. The neck seems to hang up just when you thought it should come because the truss rod hangs up in the neck block. You did reduce the truss rod tension right? Just pull the neck straight out from the body keeping the neck in its original orientation to the body. The truss rod usually pulls easily out of the neck.
Pin Removal
You might be able to lever the pins out with long nose pliers. This is a good start. But you may break off one or both pins. Or, someone has already broken them off before you and decided to leave well enough alone.
Tools
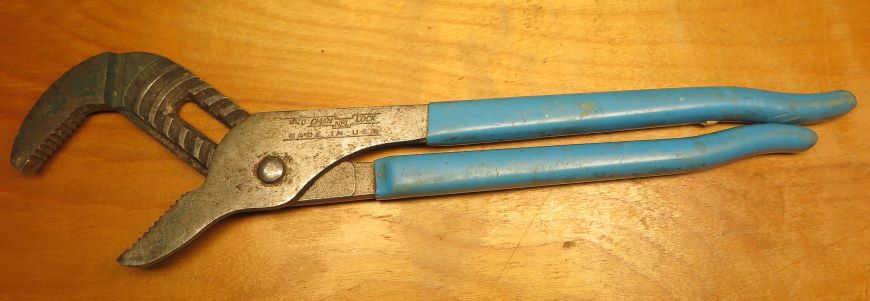
This is what you need to remove the pins, broken or not. The most important pin removal tool is the Channel Lock number 440 pliers. Don’t use larger, and don’t bother with smaller pliers.
The pins are tapered. So, you can only push them out from the small side. Generally, the pin closest to the guitar top has the large side standing proud on the left (guitar neck oriented on the left for right handers). The bottom pin has the large end standing proud on the right. This is important to know. You can always tell where the large end is because the large end is always standing proud from the side of the neck block. If one pin end is visible, you know right away that you going to press the pin out from the opposite end. To press broken pins out, you should prepare three 20 penny bright common nails as shown below.
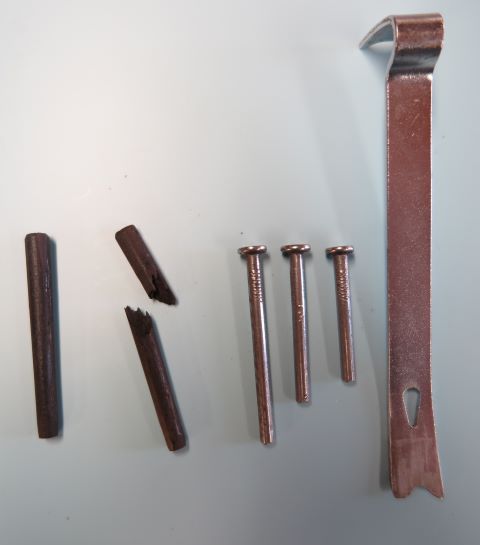
In the picture above you see two ebony pins, one whole, one broken. Also, there are three cut off nails with heads intact. Nail number 1 is 1 ½ inch. Nail number two is 1 ¾ inch. Nail number 3 is 2 1/8 inch. You want smooth nails. Not screws. Do not be tempted to use screws as these will jam in the pin holes. Also, be sure to use “bright common” nails. Other versions may have green or brown colored adhesive. That may also cause problems. The tool on the right is a very small Vaughn brand pry bar. I modify and use these for all kinds of pin and screw removal tasks. I like that brand the best because the steel is best. Note the modified curve ground into the straight end. Use that end to pry out stuck nails. Three nail lengths may be needed because the working space inside the upper bout is very limited. Use the #1 first, then #2, finally, #3 depending on how hard the pin is to force out. Be sure to press from the small end of the pin.
How To Use the Pliers
First, after inserting the short nail, set up the pliers. Open the pliers full width. Push the handle end of the pliers into the sound hole first. The pliers go completely inside the guitar body. Take care not to damage the sound hole spruce wood. The straight side jaw goes on the opposite or large end of the pin, but not pressing on the pin. You may have to put a wood block under the curved end so the jaw rests on the nail head. The curved jaw presses on the nail head. Reach into the sound hole as far as you can and close the pliers gripping the handles. In most cases, the pin will move part way out, unless the pins were installed by a gorilla. If the large end was intact, at this point you can just pull the pin out. If the large end of the pin was broken off, continue pressing with the longer nail pieces until you get the pin all the way out. You may have to use the little pry bar to pull the last nail out. The tenon is holding the nail in place. Hold on to that neck!!
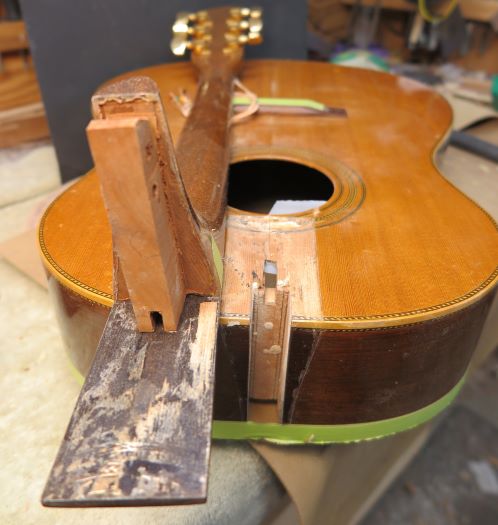
Here is a picture of the tenon and mortise.
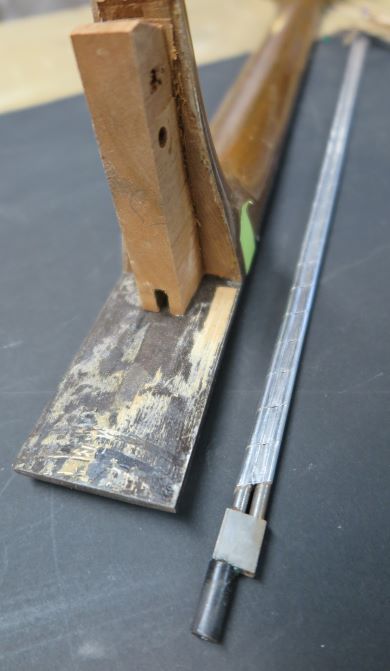
Below is an image of the neck with truss rod removed.
Converting Pinned Mortise to Bolt-on Mortise.
I advise converting the pinned mortise and tenon to a bolted mortise so that the bolts are parallel to the neck. This is much easier to work on during a reset procedure. Instructions follow.
1. Plug the original holes in the tenon with ¼ inch mahogany dowel. The holes should be drilled to ¼ inch first. Use Titebond 3.
2. Use a 3/8-inch Forstner bit to create a little very shallow flat spot on the end of the tenon. This prepares the location of the next smaller hole (instructions below). Reason is, most Gurian guitars I have seen have a slanted cut on the heel end of the tenon. A regular drill bit does not like to drill into a slanted surface. A Forstner bit can.
3. Drill a 5/16-inch hole in the tenon from the heel end down towards the fret board 1 inch from the fret board allowing room for the truss rod to push through. A drill press must be used. It is impossible for the human hand to drill this hole accurately. Use a sharp 5/16-inch brad point bit. There is only one chance to drill this hole, so set up carefully. The fret board is oriented down on the drill press table, so, because the fret board is radiused, tape two 3/8-inch wide flat sticks the length of the fret board along the edges so the fret board can sit on the drill press table without rocking.>
4. Install a sized 5/16-inch maple dowel in the hole just drilled. This dowel should stand a little proud of the tenon bottom (heel end).
5. Use 5-minute epoxy to glue the dowel. Do not let any epoxy touch any other part of the guitar as it will instantly eat finish and ruin lots of other things as well. Preparing and gluing this dowel in place is the most difficult part of the entire neck removal and upgrade procedure. It is a mess, so have lots of paper towel ready. Use epoxy sparingly. Don’t fill the hole. The dowel may have to be pressed into place with epoxy spilling all over the place if you put too much epoxy in the hole. Type 3 Titebond can also be used, but epoxy is ideal because it fills gaps better than any adhesive. Don’t use CA glue. It is too brittle.
6. Allow the epoxy to fully cure.
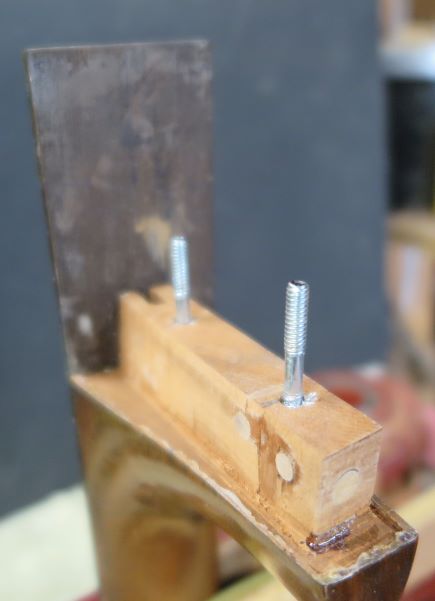
7. With the guitar body standing tall on the work bench, upper bout top most, drill two holes in the neck block. Locate the holes 1 ¼ inch 3 inches from the fret board extension. Center with care. Use 3/16-inch bit.
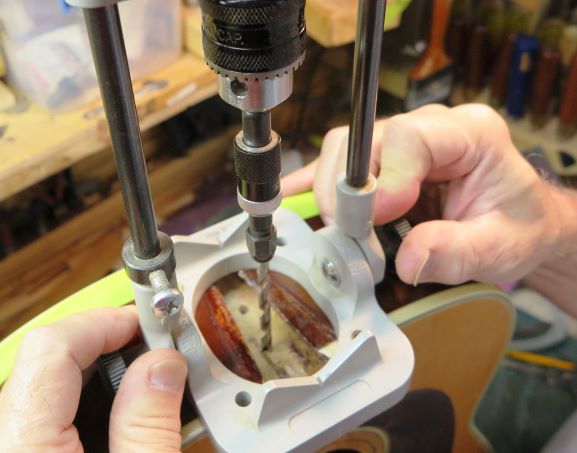
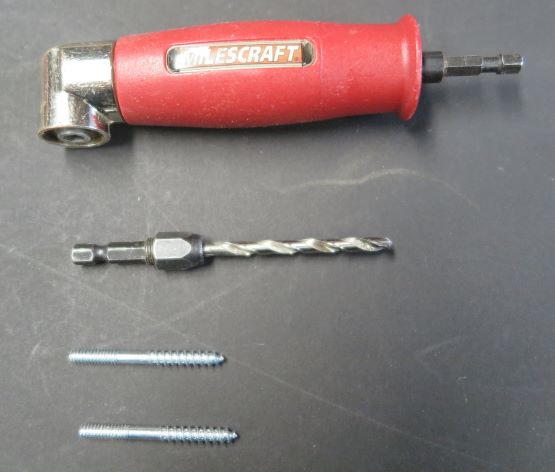
(Guitar body shown above is not a Gurian, but you get the idea.) This should miss the serial number and model number stampings on the neck block. 8. After the holes in step 7 are drilled, push and hold the neck and tenon into the body taking care not to stress the fret board extension (i.e. the top). Be sure to press the neck heel against the body. This might take two people. Use the tool and drill bit (3/16-inch) assembly shown below to locate two holes in the tenon. Only drill very shallow holes at this point. You are just marking hole locations in the tenon. Drill inside the guitar body, towards the tenon. The red right angel driver (or similar) shown below allows drilling through the neck block from inside the body thereby marking the holes accurately in the tenon.
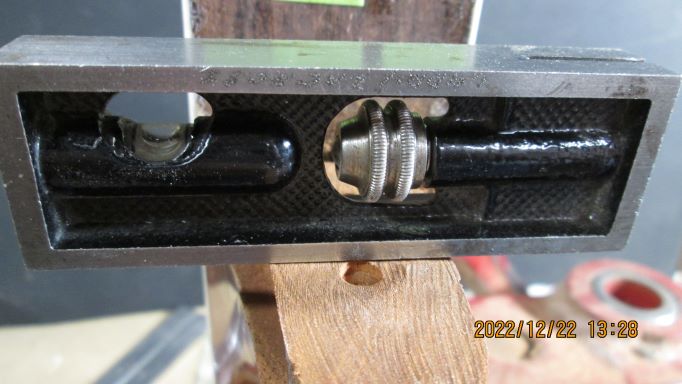
9. Remove neck from guitar body and place vertically in a vise. Pad the vise jaws. Drill two 11/64-inch holes 1-inch deep and perpendicular to the face of the neck tenon. Maybe it is more accurate to say “parallel to the center line of the fret board”. I use a mini level to set the neck vernicle in the vise. Helps a little. Now you see the reason for the 5/16-inch dowel rod. Should counter bore about ¼-inch into the 11/64 holes just drilled with a slightly larger bit. This prevents splitting the tenon. Install two hanger bolts. These are 10-24 thread 1 1/2-inch long. One end has coarse thread which goes into the tenon. These are shown in the previous image and below, installed. When you buy the hanger bolts, also buy the nuts to fit and two washers.
10. You may have to chisel a bit into the guitar body neck socket so the truss rod can slide straight in. The adjustable Allen socket barrel orients towards the guitar body back.
11. Now you can bolt the neck onto the guitar body. No glue needed. However, on final installation, the extension is glued down. While resetting, you can bolt the neck firmly into the body and conveniently and accurately check the fret board alignment in relation to the bridge, pin holes, etc. You can remove as needed for reset adjustments. This is the entire reason for converting the Gurian pinned neck to a bolt on neck.
©2022 D.R. Hanna