True Channel Binding Router Guide
Rating: Two stars for poor instructions and other problems. (out of five, five is best)
The True Channel Binding Router Guide is potentially an excellent tool to have in any luthier or DIY shop. Even if you are only finishing one guitar, it is well worth buying. It is really nice for back binding where it is tough to set up any router to cut a proper rebate in that curved or arched back surface. And a wedge attached to the bottom of the trim router just does not cut it.
But the True Channel system has some flaws in terms of safety and functionality which I hope to describe here. Nevertheless, I bought one and am using it successfully after modifications.
The kit consists of a vertical guide which you bolt to piece of cabinet grade plywood (3/4-inch thick). This assembly is well built and works well, though the “stops” are a little weird and only one out of two supplied is useful.
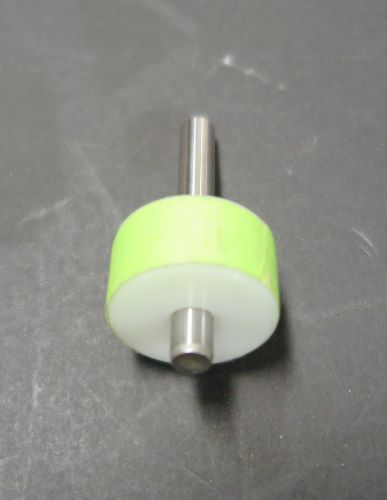
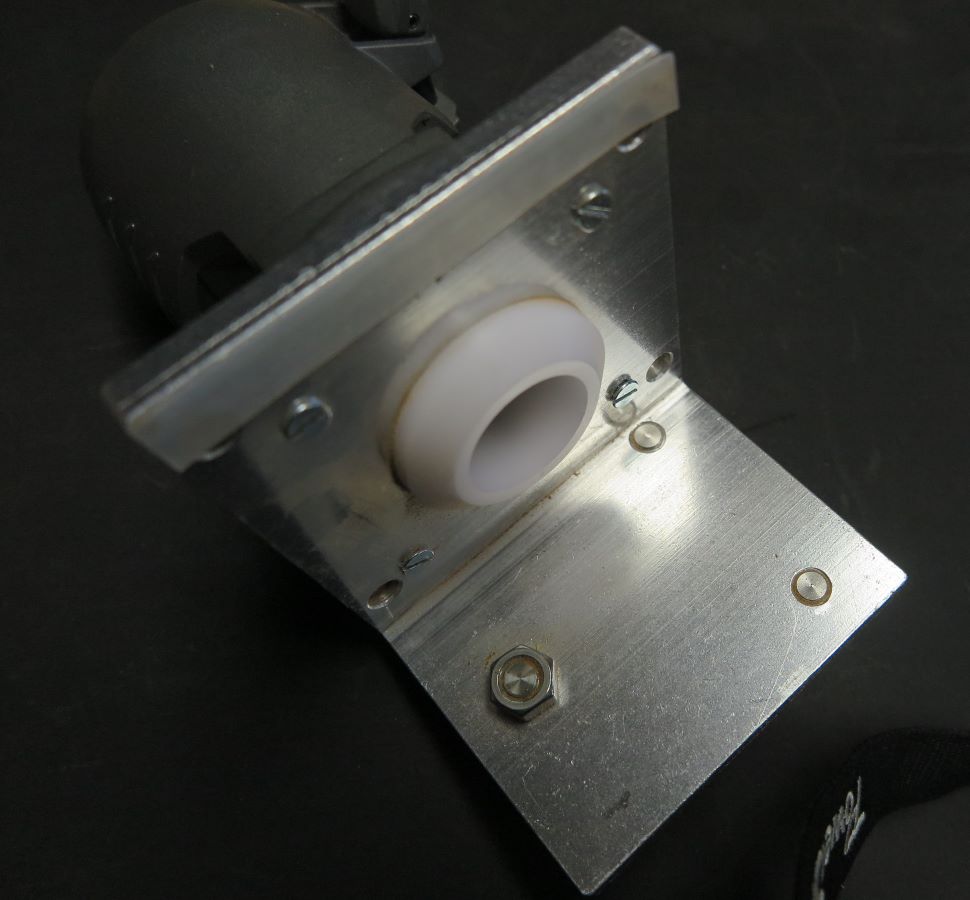
The router guide assembly consists of three roller bearings that ride on the vertical guide, a platform to which you bolt a trim router, and a low friction “donut” providing consistent depth of cut unaffected by back curvature by resting on the top outer surface of the back or top. Be observant of the donut riding on a finished top because it can leave marks. Probably leaves marks on unfinished wood too.
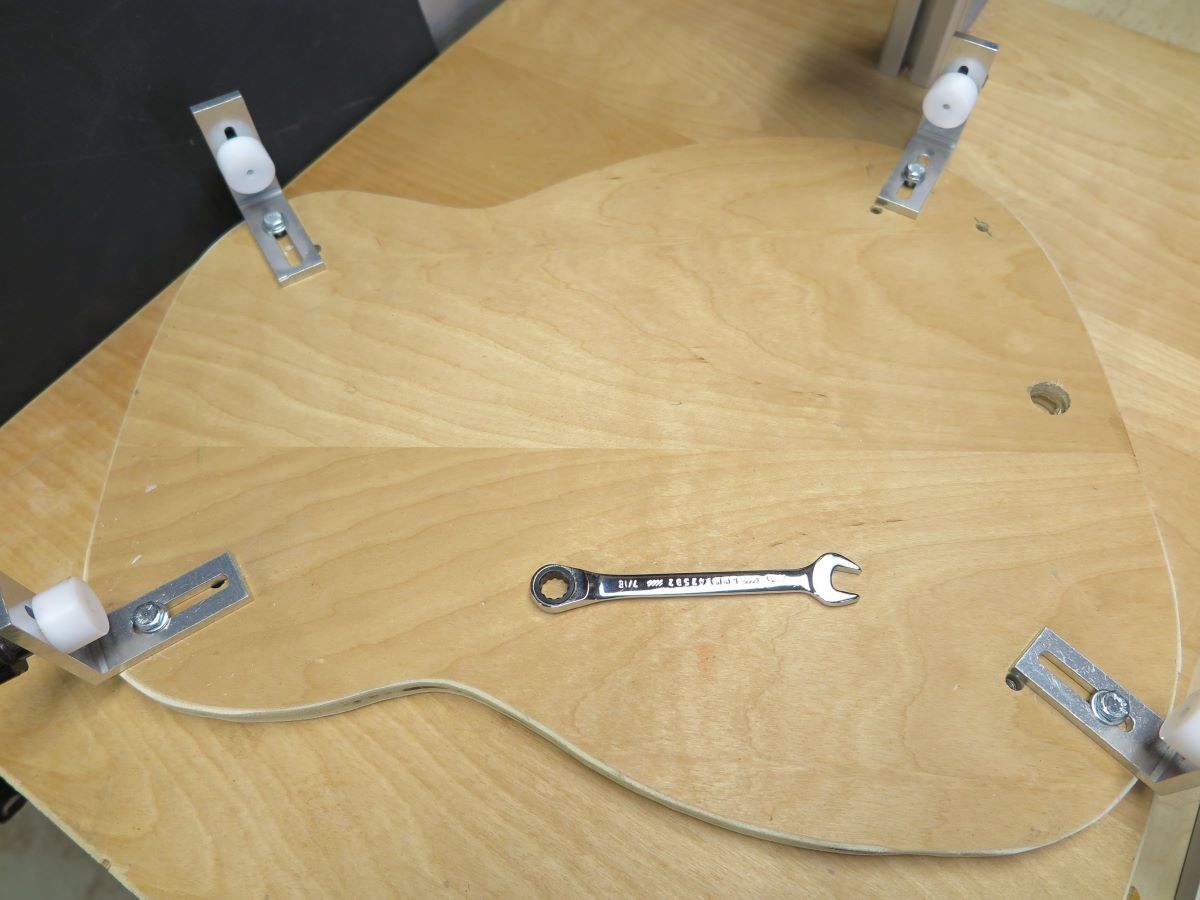
The guitar body height management and holding system or jig includes four angle clamps which hold and level the guitar body. You bolt these to a guitar shaped piece of plywood (3/4-inch thick). Once the body height is established with back or top level, the guide works well. But with all precision adjustments, the devil is in the details.
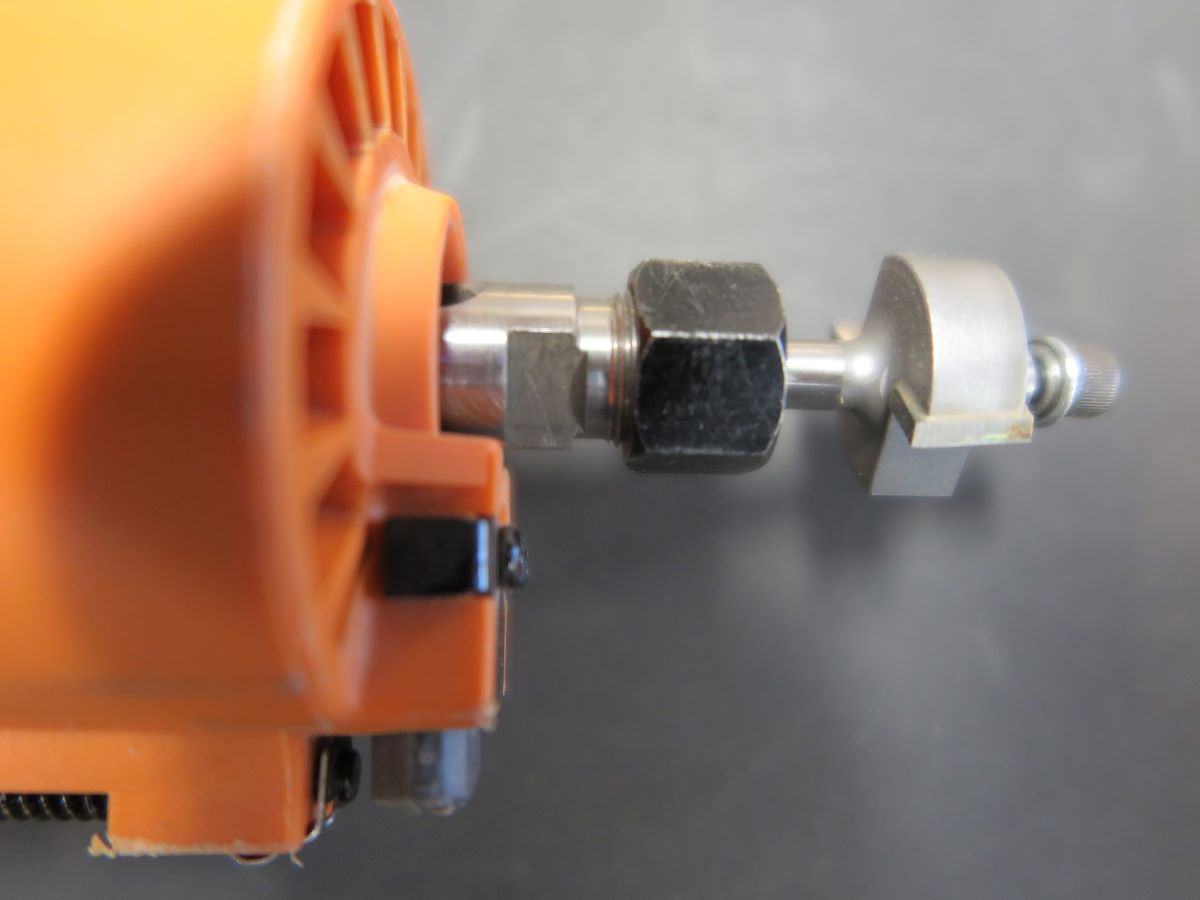
In my opinion the donut design has a major flaw. It is too thick. Any trim router mounted on the platform with a cutter bit installed correctly cannot extend the bit far enough into the platform and past the donut to cut anything. So, you have to extend the bit too far out of the router chuck. Problem is, all router bit manufactures state that you must push the bit into the router chuck as far as it will go except for any curved area where the shank meets the cutter. This is a matter of safety. If the bit is too far out of the chuck, it is liable to fracture due to rotational load forces which are dynamic at 20-30 thousand RPM. Also, excessive wear is caused to the chuck. They need to make the plastic donut much thinner. And I doubt we can sand the thing thinner because it is made of ultra-high density plastic.
The router platform is set up for the Bosch Colt trim router with holes pre-drilled for that router’s base. When I bought the Binding Router Guide kit, I realized that the instructions suggest using the Bosch Colt trim router, so I bought one. Then it hit me: I chucked one of those in the trash ten years ago because it was completely unusable. There are two massive problems with this router. When the clamp lever is closed, both the gross adjustment and the fine adjustment settings change. There is no way to prevent this, either by adjusting the clamp lever or holding the platform different ways. Plus, the fine adjustment wheel is pain in the butt to use if it works at all. So, yet another boat anchor. Maybe I can get the sharks to bite on this thing fishing from my yacht.
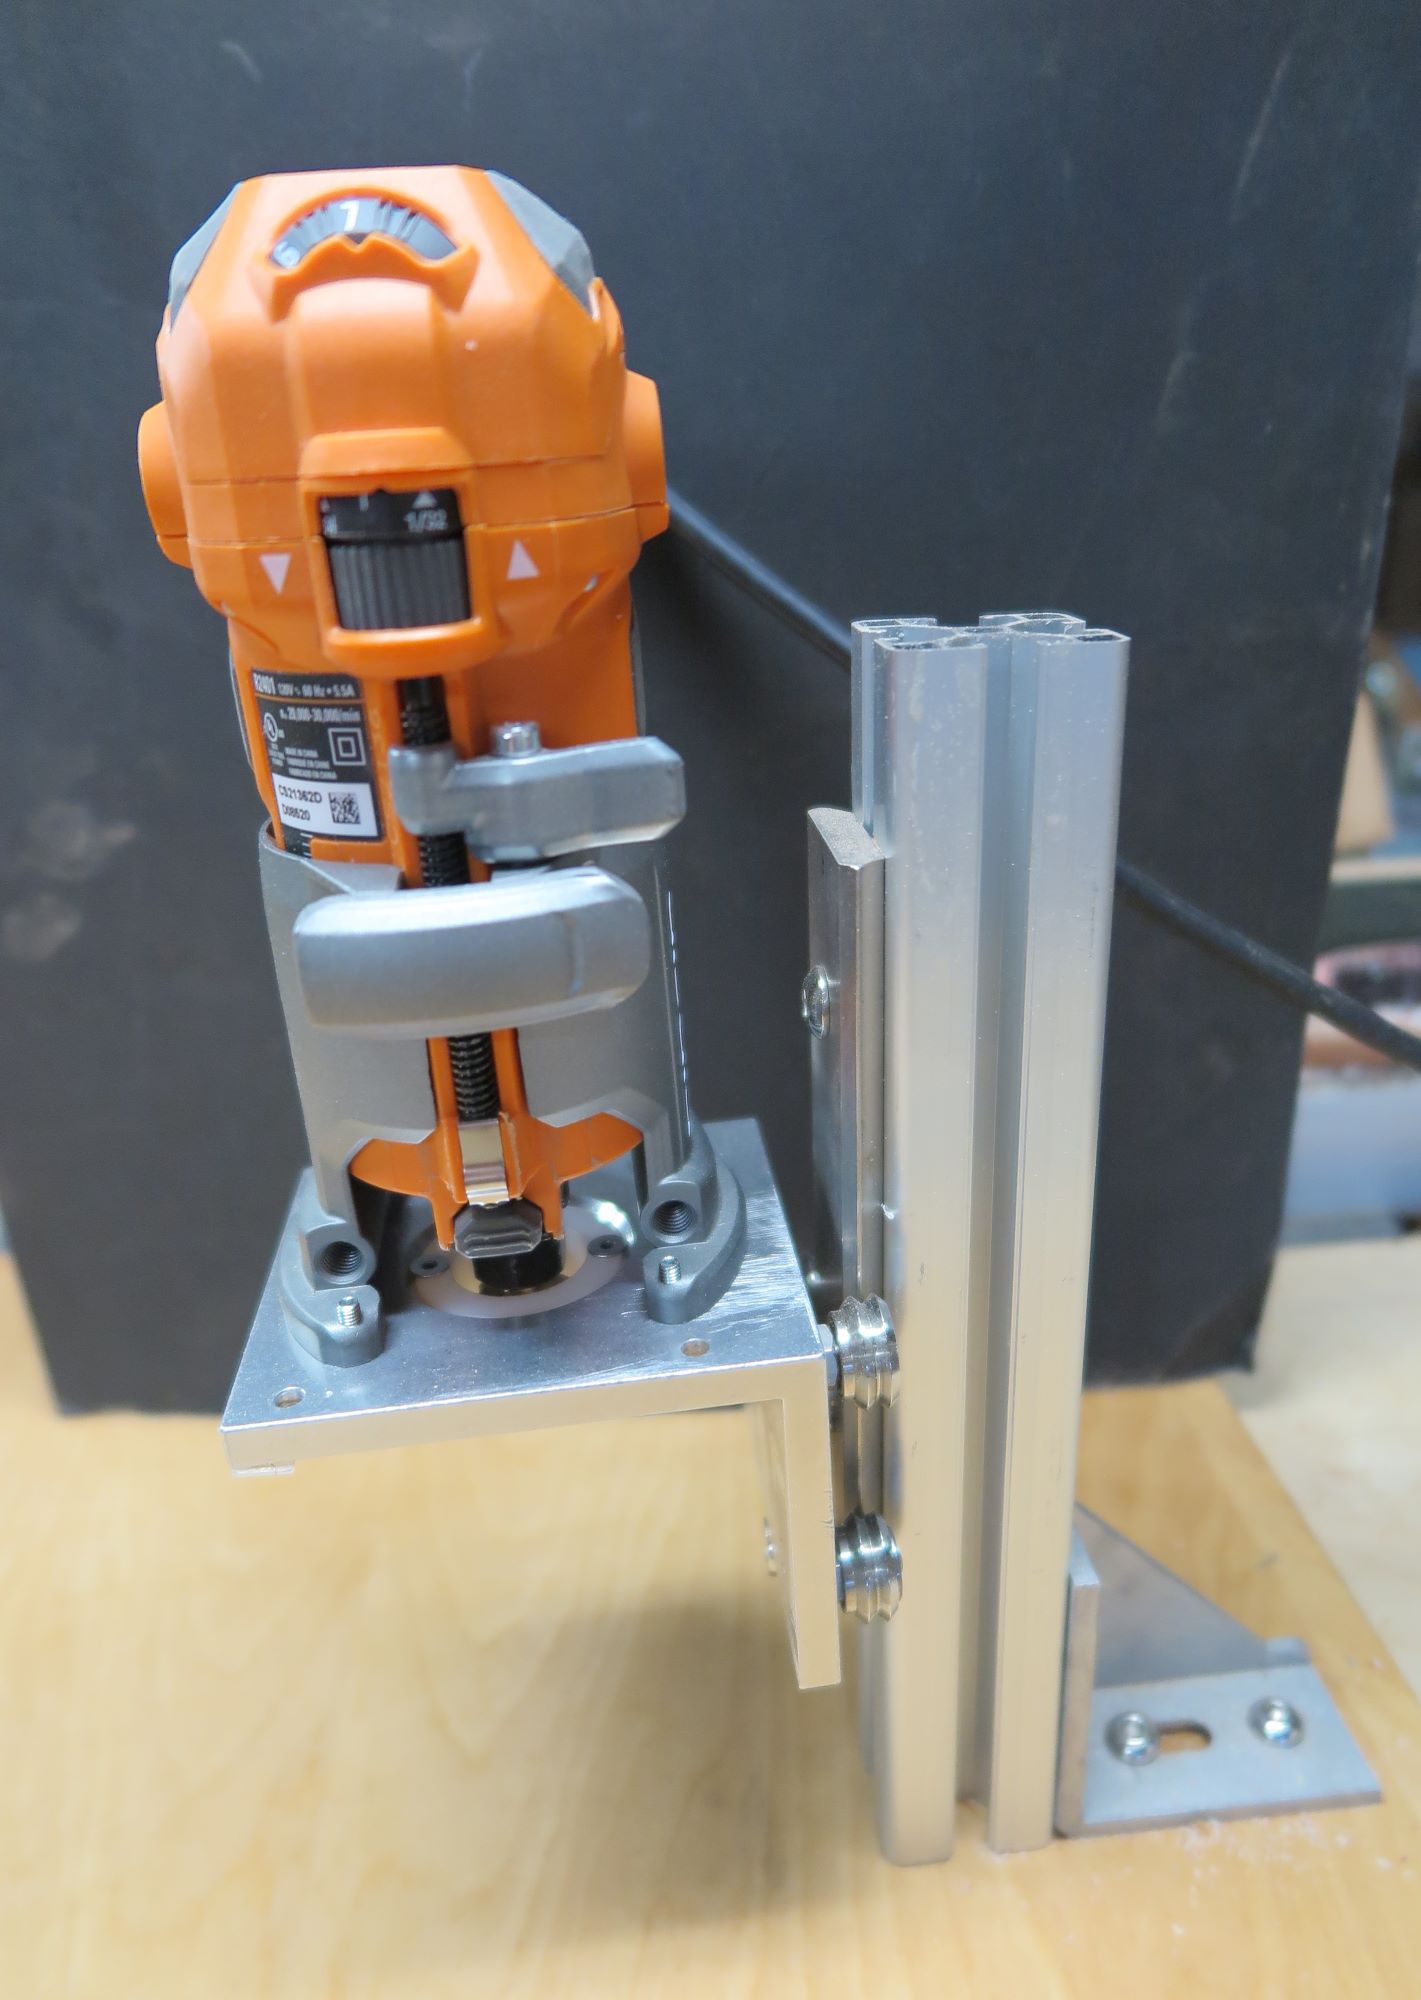
Instead, I installed the Ridge brand trim router. Both the gross and fine adjustment systems work very well. The fine adjustment system is especially nice. Also, the on off switch and shaft lock are nicely designed. Overall, the Ridge brand router is far better in every way.
True Channel supplies a little Plexiglas plate with a center hole pre-drilled. This is intended for mounting other routers. But this just moves the router even further from the platform and donut. So, the Plexiglas plate went in the trash. I mounted the Ridge router base directly on the platform.
The instructions suggest using the suppled router centering guide when installing the a different trim router on the platform. The supplied centering guide implies that absolute centering of the router chuck is required, but it is not. The cutter bearing won’t allow a bad cut as long as the appropriate bearing is selected. However, being a precision oriented kind of guy, I used the centering guide anyway. You push the ¼-inch pin into the plastic guide thingy, chuck the pin into the router, then push the plastic ring thingy with router installed on to the router platform.
Use a very sharp and skinny scribe (carbide is best) to mark the router base mounting through the base holes. Remove the router and centering guide and punch a dimple into the holes just marked. Drill the mounting screw holes 1/32-inch over-sized because it is unlikely that you will locate the holes perfectly accurate. No worries, as long as you can screw the router base screw onto the mounting platform, all is well.
You also have to buy longer metric/SAE screws to fit the router base as the manufacturer supplied screws are too short.
So, how does it work? Of course, you will have to fiddle with the adjustments to get best results. There are two critical dimensions to check. The rebate depth perpendicular to the sides is controlled by the guide bearing you select. Rebate depth parallel to the sides is controlled by the router depth of cut setting. This is where the Ridge router really shines. Depth of cut adjustment is exceptionally easy and precise. You should check all router and guide bearing settings on scrap hard wood. Do not use pine or spruce.
There are other tricks to using the Binding router guide. I am sure you will find more, but here are several I discovered:
Add green tape (3M 2060) all around the body sides where the roller bearing touches. Reason is, anywhere the bearing touches will leave a mark on a finished side. (I do a lot of restorations and zero from scratch builds.) I realize this messes with the depth accuracy, but you want the binding to stand tape thickness proud above the side anyway. No matter what, you will have to scrape the binding slightly because the bearing guides are not sized for all thicknesses of binding plastic, which varies very slightly from vender to vender. So, a little adjustment is better than too deep binding plastic.
When you are starting a cut, pull the guitar body away from the router bearing about 1/16-inch. On startup, the zero to 20,000 RPM start up of the bearing leads to friction marks on the guitar side wherever it touches. Once the bit is up to speed, you can slowly (slowly!) push the guitar body into the cutter. The green tape definitely helps to prevent marks.
Ignore the StewMac instructions for mounting guitar body onto the angles. Ignore the instructions for attaching the angles onto the plywood guitar body shape. You are mounting the four aluminum angles on the ¾-inch plywood guitar body shape. Install hex head 1-inch X ¼ 20 bolts and washers down through the angles and into the plywood into some ¼ 20 T-nuts. Buy a flat 7/16-inch quick wrench. Install and level the guitar body top down (for back binding) onto the aluminum angles which are sitting on the plywood guitar body shape. The instruction "Verify the guitar sides are perpendicular to the plywood" is nonsense. Use a level on the guitar back. See below. Use the quick wrench between the guitar top and the angles to loosen or tighten the bolts as needed to lock the angles in place. The quick wrench makes adjusting and affixing the angles and bolts easy. Just be sure to leave enough space between guitar top and the bolts. An inch is plenty.
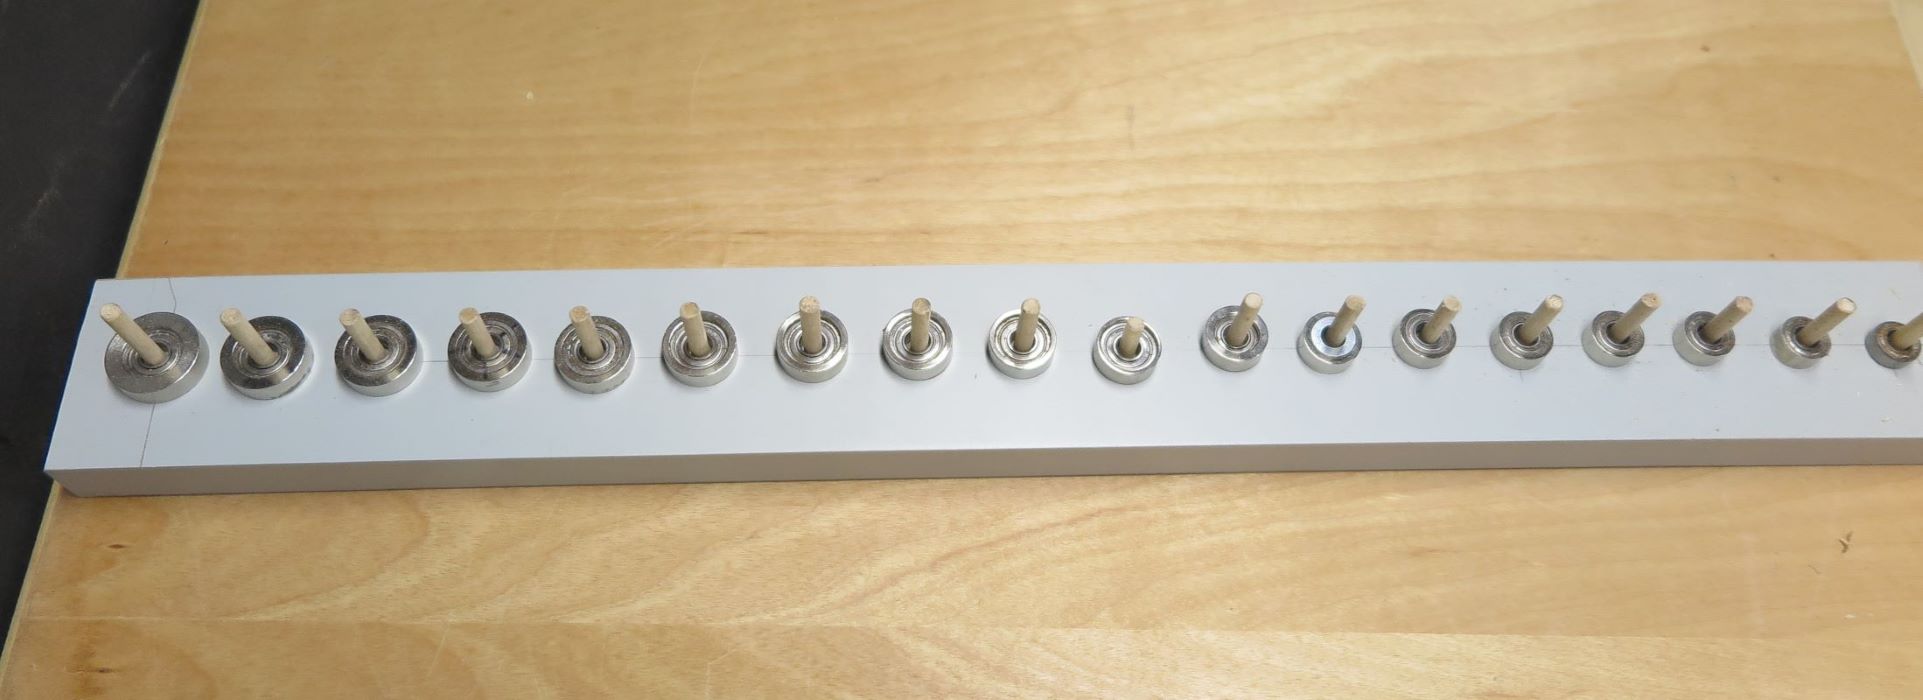
Make a bearing storage rack. I used a ¾-inch X 3-inch wide piece of maple to mount the bearings all in a straight line sorted largest to smallest. (When will we ever use those tiny guide bearings? Triple herring bone binding?) You will find that locating the bearing for optimum depth of cut requires comparing slightly larger or slightly smaller bearings until the best fit is found.
Once you find the optimum guide bearing for the binding or purfling you are using, mark that on the storage rack. I bought a second Ridge trim router for purfling. I leave it set permanently for the purfling I like to use. Sure saves time.
(2023-11-20) Grab an old wood or plastic 10-inch pocket level and grind a shallow arch on one edge. Leave about 1/2-inch original surface on both ends. You can now use this to level the guitar back in the angle clamp board. Reason is, the back is arched, so you want only two points of contact. The level will still work for the top. You will have better results if the back is as level as possible lengthwise and side to side. (Sorry grandpa, hope you don’t need to use this.)
I will continue to use the True Channel rig and do guitar back binding rebates with it. Results are excellent and repeatable with the Ridge router. However, I will continue to use my Hitachi TR-6 router for top purfling and binding because the adjustability is second to none.
Ridge Brand router installed on platform. Also showing vertical support.
The platform looks cockeyed in this image, but that is just camera angle.
Guitar body holding jig and 7/16-inch quick wrench. You can see the "quick" feature on the wrench left end.
Platform showing cutter and guide bearing

Bearing storage rack
The Plastic Donut
Unsafe bit extension
Centering Guide (I added the green tape for precision purposes.)
Oddly, the pin is too large to fit the donut. Grip the donut with a pair of pliers and drill to 1/4-inch on a drill press. (Once again, I find myself asking, did the documentation writers actually have this kit in hand and test all the procedures using all the parts? If they did, was feedback supplied to the project manager?)