Refret Tools and Techniques
Original equipment Harmony Sovereign guitars (H1260, H1203, H1265, H1266, etc.) are fretted with very low and soft fret wire. This article describes one way to re-fret a Sovereign using modern hard high crown frets.
I recommend re-fretting with Stewmac #0155 medium/highest fret wire. These higher frets are much nicer to play. Also, they can be reduced later as play wear notches develop. Installing the 0155 fret wire in a stock Harmony Sovereign fret board requires widening the fret slots to .025 inch. The great thing about widening the fret slots is a future refret is much easier because the fret slots allow widely available modern fret wire which require wider than vintage Harmony fret slots. This is especially true for Harmony guitars made in the 1960’s. Plus, this procedure helps make the guitar sound better because the fret slots are "hardened".
The following procedure works nicely on any acoustic. The tools listed are pretty much required for a top notch job especially if the fret board is plastic bound.
Tools
-
- NECK REMOVAL TOOLS
- 3M Green tape "For Hard To Stick Surfaces"
- Fret removal pliers
- A good steam generator. Get a wall paper steamer.
- Stewmac #4059 Neck Joint Steamer
- Stewmac #4737 Neck removal jig. Or make your own.
- Straight pick from Woodcraft set # 158880 or equivalent. This tool has a nice thick handle. This is important because you will use this pick for many repair tasks. My pick tool has a clear plastic handle in the images. Someday I might buy a good pick.
- Silicone heater pad.
- Grooved aluminum heat transfer block, shop made. This is not required, but does help to reduce burning when heating the fret board extension.
- Low cost HVAC thermometer, rod sensor type. The PELTHP220C - Rubbermaid Industrial-grade Analog Pocket Thermometer is fine.
- Stewmac #4466 is super nice for fret board extension, bridge, pick guard removal. A most valuable tool.
- Stewmac #4464 Bridge/Finger board removal knife.
- Small spatula. I recommend the Ateco Palette Mini Flat Spatula. The business end is beveled and sharpened me on one side of the blade tip.
- 1/4 inch or 3/8 inch chisel
-
- FRET BOARD PREPARATION
- Stewmac #0010 CA thin glue with at least one whip tip. Stewmac supplies several whip tips with each bottle of their thin CA glue. That makes this valuable product indispensable. It’s the best stuff on earth.
- Stewmac pull saw numbers 3570, 3571, 3572, 3573 gauged pull saws.
- Stewmac 9.5 inch radius block #0405. Can also use 10 inch radius block.
- Stewmac #5435 fret slot depth checker
- Stewmac #4870 fret slot cleaner tool
-
- FRETTING
- Stewmac #1296 dead blow fretting hammer is the best of the bunch. The small dead blow hammer is preferable to all other types. A plain hardware store variety is also excellent. Just make sure it is no heavier than 10 ounce. These hammers pack a serious wallop. You will know it if you hit your finger.
- Twenty-five pound bulk bird shot bag for use as dead weight backer pad to rest the neck against when fretting. A large pad is preferable.
- Stewmac #4431 Jaws Fret Press Pliers
- Stewmac #4369 fret press caul. It is also nice to have the 4368 and 4371 cauls for similar pressing duties on other frets.
- Xacto X75350 Extra Fine Razor Saw Set. See Note 3 for instructions on how to modify this tool into an excellent fret slot cleaner. Use in conjunction with Stewmac 4870.
- Stewmac #1303 three corner fret end deburr file
- Heavy Cast iron or steel Fret board extension fretting anvil. See Note 5 below. This is optional, but required if you want to install frets on the fret board extension before the neck is attached to the guitar body.
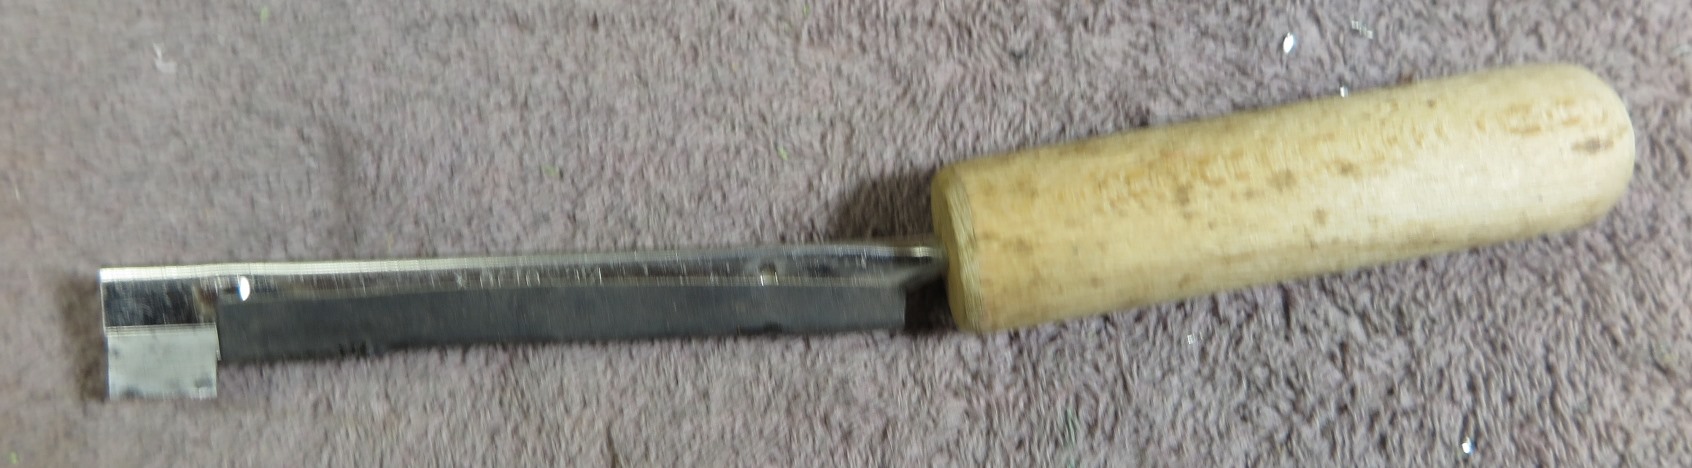
- Nicholson "Handy File" This is sold in just about every hardware store and lumber yard store in the country. It is easily identifiable by having a round handle with a hole. See Note 2.
-
- CLEANUP, BINDING, AND MARKER INSTALLATION
- Stewmac #1976 Bind All cement
- Standard square steel card scraper
- Milwaukee Carton Utility Knife Blade (may need 3-5) or similar. Carton blades are nice because the ends are rounded and therefore less likely to dig in or scratch.
- Stewmac #0030 CA thick glue
Before any full re-fret is attempted perform the following steps:
- Remove nut. Nut most likely will have to be shimmed to account for higher frets.
- Remove the fret board binding, including end piece and save for later use. Use a chisel to start the binding loose at the nut end. It should pull off surprisingly easy. If you break it splicing is fairly easy. However, you may wish to replace the OEM fret board binding with a tropical hard wood binding. This allows through cut fretting which is a much better set up than plastic binding which requires trimmed fret ends. To replace fret board binding with hardwood binding requires a very good quality block plane and some carefully chosen rosewood strips, preferably quarter sawn straight grained.
- Remove any marker dots remaining in the fret board edge or the plastic binding and save for later use. Use the chisel to pry these loose from the fret board edge. By the way, Stewmac #0484 plastic dot marker rod is a perfect replacement.
- Remove the 15th fret dot marker and save for later use. Use the pick for this. Best way is to push the pick down into the fret board wood adjacent to the MOT dot marker. The wood is easy to repair, the dot marker cannot be repaired or replaced as modern versions are not available in this size. The little plastic marker disc will pop right out. You do want to remove this marker before heating the fret board extension because it melts at rather low temperature.
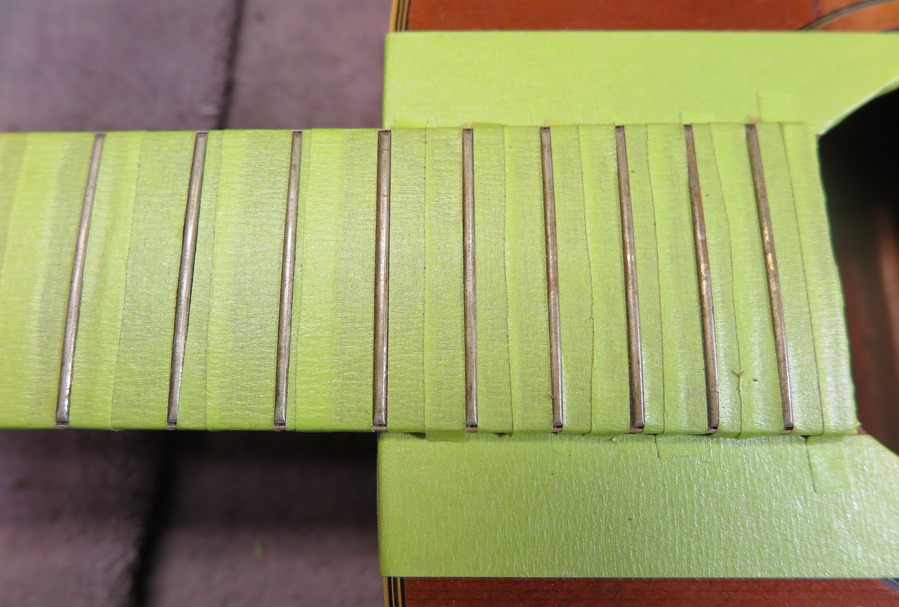
- Tape the fret board (see illustration below) with 3M "Hard To Stick Surfaces" tape. The vintage Harmony Sovereign fret board is usually very dry and brittle and subject to severe chipping when frets are removed. The following tape and glue procedure usually eliminates all chipping.
- Remove all frets
- Press down all green tape on the fret board. This holds down any chips in place.
- Use the thin CA with whip tip to dribble minimal CA glue into all fret slots. Don't insert so much CA that it runs out onto the neck finish or onto the guitar top. Keep the fret board level for at least 15 minutes. Let dry 24 hours. You will notice the CA glue soaking under the green tape. Not to worry: this is easily corrected later.
- Remove all green tape. Don't worry about any tape residue on the fret board. It looks terrible, but will clean up.
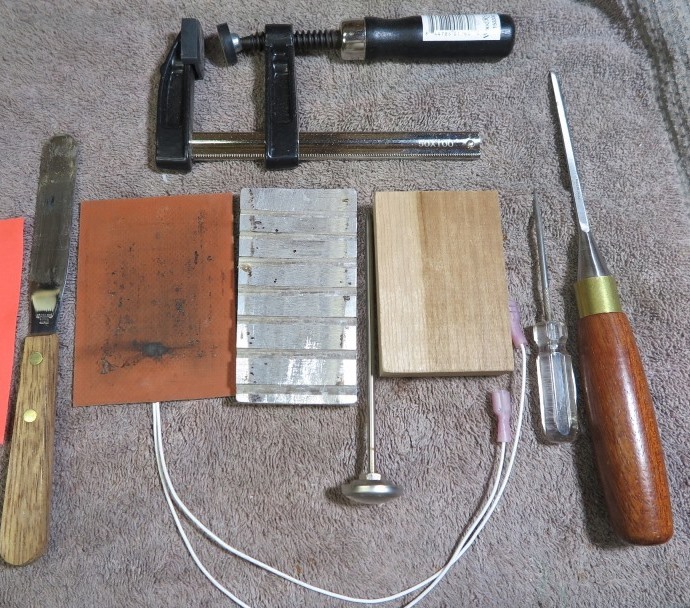
- Loosen the fret board extension using a heat pad. A shop made arched and slotted aluminum heat transfer block helps prevent fret board burning. The aluminum block rests on the extension. Place the heater mat on top. Place the hardwood block on top of the aluminum block. Clamp the block and heat pad onto the fret board extension and turn on the heat. Assuming you have drilled a 9/64 hole in one end, insert the thermometer into the end of the aluminum block. Do not allow the heat to exceed 140-150 degrees. Use a spatula to loosen the extension from the sides first, then from the extension end. Be careful not to lift the extension more than is necessary to release it from the top. The image below shows chisel, pick, heater block, thermometer, aluminum heat transfer block, red heat pad, small spatula, small bar clamp.
- Remove the neck from the body. See elsewhere for instructions on this procedure. Take extreme caution not to break off the fret board extension.
- Truss rod replacement happens here if needed. If you do need to replace the truss rod, the Stewmac dual action truss rods are excellent. The 2551 is perfect for the Harmony Sovereign gear head configuration and is easy to install using a slotted jig and router guide.
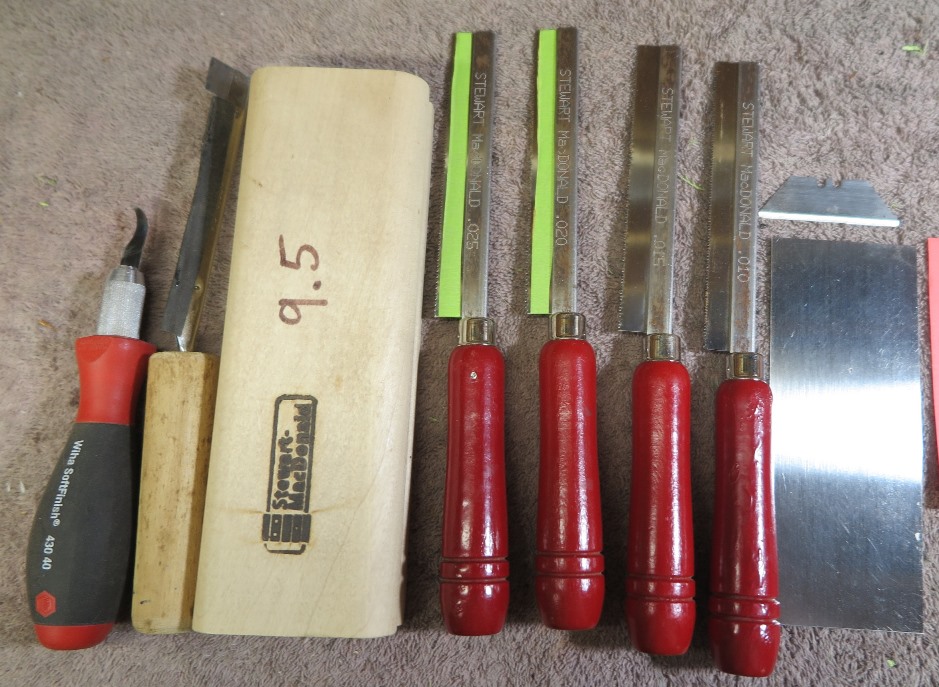
- Tools for the following fret slot preparation procedures are shown below.
- Prep and clean fret board.
-
- Remove any remaining green tape.
- Scrape off all tape and glue residue using any combination of scraper card and carton blade. Always scrape at an angle to the fret slots.
- Clean and patch all finger nail divots and any broken places around fret slots. Patching works better if you use a little naphtha to clean the divots first.
- Tighten truss rod until there is very slight hump between first and twelfth fret.
- Use the Stewmac radius block to sand fret board using 320 grit until clean and straight and the radius is consistent the full length (Do not finish sand just yet.)
Prepare Fret Slots
- Widen fret slots using the Stewmac pull type fret slot saws. Start with .010 saw, progress through next thicker sizes, end with .025 thickness saw. You don’t want to deepen the slots, only widen. You must hold the neck in an appropriate luthiers vise. The Guitar Repair Vise # 1813 is excellent. The Gyro or Versa tall jaw vise is also excellent.
- Check fret depth on every slot with Stewmac tool #5435. This tool also verifies slot width for #0155 fret wire.
- If desired re-install original fret board binding (recommend Stewmac #1976 Bind All cement) and 3M "Hard to Stick" green tape -- NOT Gorilla tape!)
- OR
- Install new plastic fret board binding
- Clean all fret slot depths with Stewmac tool #4870. This is a critical tool at this point.
- OR
- Install hardwood binding. Maple is a bad idea here. Honduras and Indian rosewoods are very nice.
- Clean all fret slot depths with Stewmac tool #4870. This is a critical tool at this point.
- Use green tape to mask off the neck wood finish adjacent to the marker dot holes.
- Install fret board edge marker dots saved previously using Stewmac #1976 Bind All Cement.
- OR
- Install new fret board edge markers using Stewmac #0484 plastic dot marker rod and Stewmac #1976 Bind All Cement.
- A word on Stewmac #1976 Bind All Cement. This stuff sets very fast, seconds in fact. So have plenty of green tape hold down strips ready to go before applying the cement. Tape or clamp immediately. Wipe off all excess cement squeeze out. Work fast! Wait 24 hours for this adhesive to dry.
- At this point you may want to wet sand the junction between the plastic fret board binding and the neck finish. Use 600 grit wet or dry (black). Don’t sand through the finish.
- Final sand the fret board to 400 grit. If you have a really nice piece of rosewood fret board, 600 grit is justified.
- Install all frets except numbers 15 and 16 to be installed after neck is on body. These two frets make neck reset procedures much more difficult because they force the fret board extension down into the guitar body top. This complicates reset procedures. So wait until installing these frets after the neck and fret board extension are firmly attached to the body.
- Assuming a plastic bound fret board, use the Stewmac #1645 Fret Tang Nipper to notch the fret ends so the tang will not cut into the fret board side bindings. This tool is essential if you want to fret plastic bound fret boards, which is what we have in this example.
- Use Stewmac #0619 Fret cutter tool to cut frets to length appropriate for each fret slot.
- Use the Stewmac dead blow hammer #1296 or similar to hammer in frets 1 through 9. Always use a heavy backer pad beneath the neck where you are hammering frets. The pad should be somewhat soft and flexible, but unyielding to hammer blows against any object resting thereon. The buckshot must be bird shot or smaller diameter.
- Glue in all frets with Stewmac #0010 CA thin and a whip tip. Jet in a little glue all along one side of the fret. Clamp the fret down tight using either the Stewmac #4431 Jaws Fret Press Pliers or a Stewmac #4369 fret press caul and the Caul Stabilization tool described in note 4. There will be some minor CA glue on the fret board next to each fret, but this is easily scraped off using a carton blade. Can also use 400/600 grit sand paper.
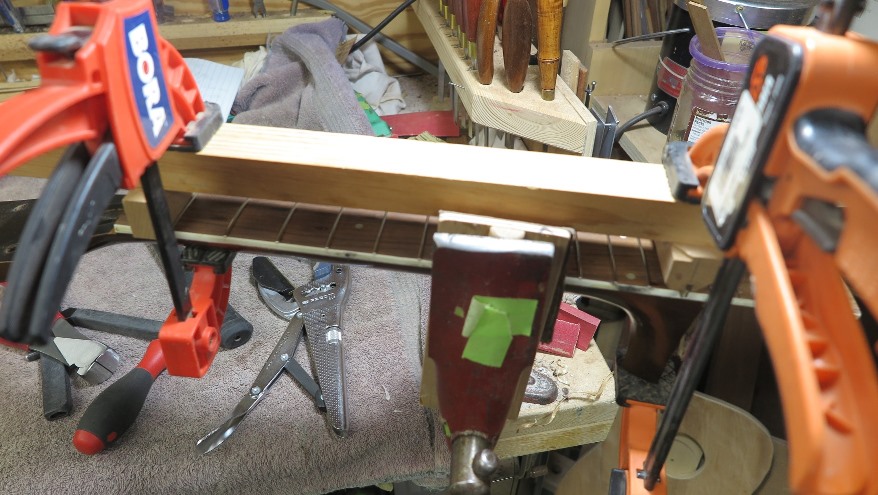
- The image below shows how to clamp frets over the neck heel (10-13). You can use this method over the fret board extension only if the neck is fully glued and attached to the guitar. Tools in use include a 1.5 X 1.5 inch quarter sawn yellow pine or maple or other hardwood beam, a Jorgensen 6 inch ISD bar clamp or similar, a lighter weight bar clamp (any brand). 1/2 x 1 and 1/4 inch block (on the left), and a 3/4 X 1 inch block holding a Stewmac #4369 fret press caul. See Note 1 for how to make this little block. This method works well if you prefer to install frets 10 through 20 after the neck is glued to the guitar body. The beam prevents the fret caul block from rolling under clamp pressure. If used properly, it also prevents neck damage. You always want to apply clamp pressure (the orange Jorgensen clamp in the image) directly over the fret to be pressed. See Note 4 illustrating the parts of this tool
- A small bar clamp is nice when fretting the extension. It can reach nicely into the sound hole. However, I prefer the largest C-clamp I can fit into the sound hole with out touching the back or back braces. Use the Caul Stabilization tool for all frets on the extension.
- Use the Stewmac #0619 Fret Cutter to trim fret ends. This is another essential fretting tool.
- Use a prepared Handy file to chamfer fret ends. See Note 2 on preparation of this file for fret end filing.
- Deburr fret ends. Use the Stewmac #1303 for this. Can’t imagine using any other tool for this delicate operation.
- After cleaning out the fret board hole with a drill bit, use thick CA glue to re-install the MOT 15th fret dot marker.
Finishing Tasks
- Perform neck reset procedures as needed
- Install neck on guitar body.
- Glue down fret board extension with or without a wedge.
- Install all remaining (15 16), chamfer and deburr fret ends
- Level frets
- Install and set up original nut (shimmed) or new bone or TUSQ nut.
- Install new saddle if needed.
Notes
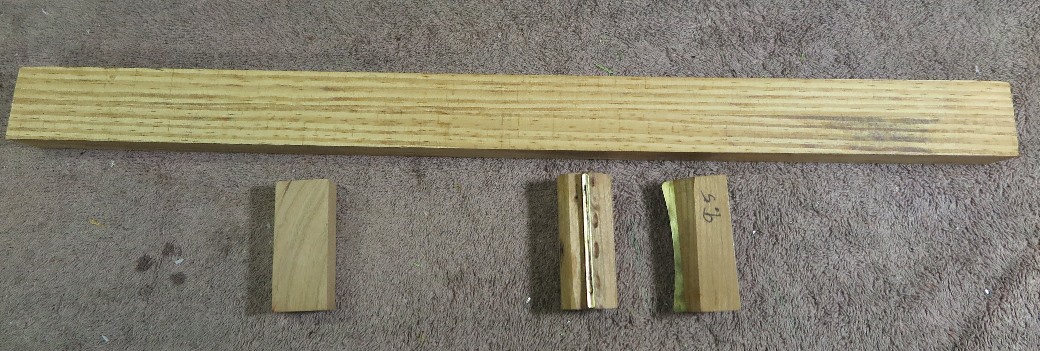
Note 1 - Making the fret press caul holder. Cut a 1 inch wide by 2.5 inch long by 1.25 inch deep block from any hardwood. The block shown is cherry.
Cut a 3/32 inch saw kerf into the block. I used a hand plane to chamfer the corners.
Stick a 3/32 inch wide strip of double stick tape on the straight edge of the #4369 brass caul.
Push the brass caul into the slot in the block constructed just above.
See also note 4 below.
Note 2 - Preparing the Handy File for luthiery use.
New Handy file looks like this:

Stick 1/2 of the length opposite the round end handle in a machinists vise. Wack the file sticking up hard enough to break off the handle. Use a grinder to round the broken end and smooth all sharp edges or corners.
Resulting file looks like this:
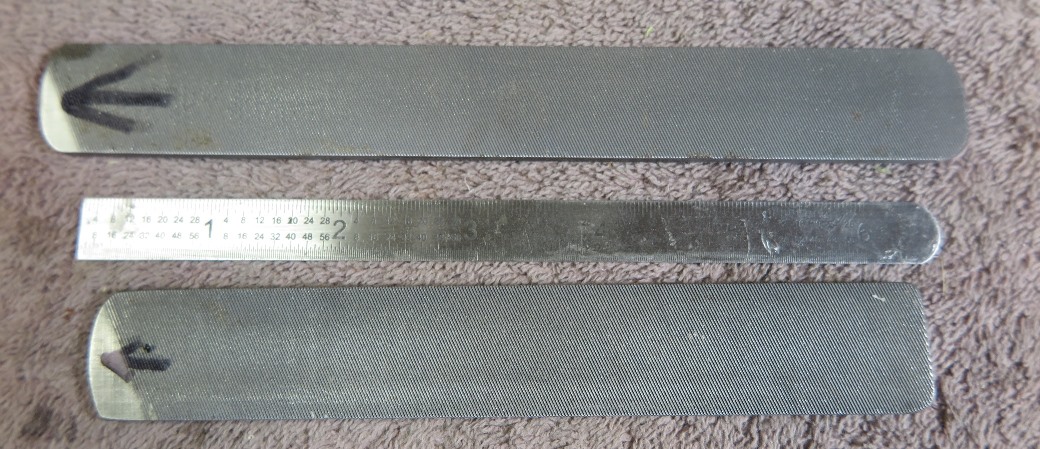
I add arrows to indicate cutting direction.
Note 3 - Preparing the fret slot scrapper
The Xacto X75350 makes a dandy fret slot scraper. The teeth have no set. The blade is very thin and easy to cut. As configured below, it slides nicely from one end of a fret slot to the other. It nicely cleans rough fret slot sides and pops out any left over saw dust or glue globs.
Cut away 95 percent of the blade leaving about 1/2 inch at the tip. Cover the rest of the blade with electrician"s tape.
I used this tool so much that the original handle disintegrated. So now it is stuck in a wood dowel.
Note 4 - Fret press and Caul Stabilization tool showing wood bar, nut end support block, and two fret caul blocks. (Use one caul at a time.)
Fret board extension fret hammering anvil.
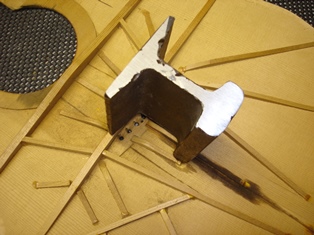
The above is a short piece of railroad track. Below it is shown in use. Provides a rock solid backing for hammering frets into fragile fret board extension. These track sections are often available on ebay or from train museums as souvenirs. This "anvil" is a critical tool for fretting into the fret board extension when not attached to the guitar body.
©2017 D.R. Hanna